Step 1: Moisturize as you normally would. Check out this post for my routine.
Step 2: Eyes
It's important to do your eye makeup first because your eye shadow and mascara will ruin your foundation.
It's important to do your eye makeup first because your eye shadow and mascara will ruin your foundation.
- Start with eye shadow primer. I use Too Faced Eye Shadow Insurance primer but Urban Decay Primer Potion is good as well. I really don't like the cheaper versions made by e.l.f. or drugstore cosmetics companies they just don't last as long.
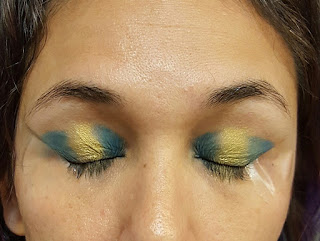
- I did a simple but colorful gold and teal eye. Here's how:
- Start with a teal shade on the outer and inner corners of your eyes.
- Add gold in the middle.
- Add the teal along the crease. Then blend.
- Add teal on the inner and outer corners under your eye and then the gold in the middle.
-
For my strong wing I used Rimmel London ScandalEyes Gel Liner. Follow these steps to get the perfect wing:

- For big lashes start with a primer like Lancome Cils Booster Primer apply a layer and let it dry.
- For my brows I used NYX Tame and Frame Bow Gel with a straight brush from Smashbox. I started by outlining my brows then filling them in.
- Follow up with highlighter shadow under the brow.
- Finish up your mascara with a bold mascara like Tart Lights, Camera, Flashes Statement Mascara.
- First I prime my face. Since this is an outdoor wedding I want a dewy luminous look so I'm mixing NYX Pore Filler mixed with Loreal Lumi in ICE.
- Now you can fix those dark circles under your eyes. I use an orange concealer like NYX Color Corrector in ORANGE. Followed by a creamy concealer like e.l.f. Cover Everything. For a more detailed guide check out this post.
- Next I Apply my foundation. I used Maybelline Fit Me Dewy because it's an outdoor wedding and a matte look just won't stay nice. I start by pouring a nickel size drop on the back of my hand and I use an e.l.f. Ultimate Blending Brush to apply it to my face.
- To blend my foundation in I use a blending sponge with a little bit of NYX Honey Dew Me Up on the sponge and I blend till it's seamless.
- Next I took Airspun Loose Translucent Powder and applied it under my eyes and in a line along the sallow of my cheek and along the sides of my chin. I use a harder blending sponge.
- Now it's time for bronzer to contour. My favorite bronzer is Benefit Hoola Matte Bronzer which I apply under my check bones. along the sides of my nose, along my forehead and on my temples. I blend with a oval makeup brush (I'll be giving one away on Instagram check @pinkhairfloosie for details). (Sorry I got something on my camera lense and the rest of the pictures are fuzzy).
- I used Benefit Benetint on my cheeks which gives me a perfect natural rosy cheek but requires lots of blending. For perfect blush smile and apply to the apples of your cheeks.
- I used Benefit Watts Up to highlight my cheekbones, the bridge of my nose, above my lip and at the tip of my forehead.
- I finished with a spray of Urban Decay De-Slick to help control oil and set my makeup to last all night.
- I prime my lips by applying a little foundation to them when I am putting it on. It preps them just fine and removes a step which I'm all about.
- I used NYX Ombre Lip Duo in BONNIE & CLYDE Start by outlining your lips with the darker shade just outside your natural lip line.
- Next apply the lighter shade on the inside and blend outward. Perfect pout.


No comments:
Post a Comment